How I Recorded These Sounds: Part 2
Hey, it’s SnakeF8!
This is part 2 of a 2-part series. Check out part 1 for the hardware portion and how to properly set up your mic. As a game developer, here's how I made the sounds for the Authentic Gun Sounds Pack! This guide is designed so that anyone with any background can learn how to record audio. There’s a lot that goes into sound design, so this is a very general guide with resources where you can learn more about specific tweaks. Like the previous part, everything here can be used for recording sounds, voice work, streaming, music and more! For music, you’ll want to do more research because there’s a LOT more you’ll need to do.
Software
The software I’m going to be using is Cakewalk, but you can use any digital audio workstation (DAW) since most have all of these features. Cakewalk is free, and the best way I can describe it is that it’s the Blender of audio engineering. Everything here can be used in Ableton, FL Studio, etc.
Audacity is also a good option, but it’s more limited in what you can do. I personally only use Audacity for general recording, and I show how to use it for that in the last part. For guitar, bass, etc, I record directly in Cakewalk.
Recording and Importing
Because I covered this in the last part, I’m going to be brief. Record your sound source or voice 6 to 12 inches away from the microphone. If it’s too loud or quiet, change your sensitivity.
Sometimes, you might already have a sound you want to use from different software or downloaded a sound online. For best results, import the WAV or FLAC version of that sound to maintain the best audio quality. You want those file types because they’re “lossless,” and that means it’s as pure of a sound as you can get. Importing MP3 files isn’t recommended because you’re dealing with lesser audio quality, and it’s harder to work with as a result. This will import the sound into a track, and a track is a channel layer that interprets the sound with its own properties. I can best compare a track to a layer in image or video editing software. Any sound in the same track will share the same properties.
Mixing and Mastering
Now that you have your sound in your DAW, it’s time to clean it up. Cut out any empty parts in the track, but be careful not to cut out parts of the sound! When it comes to adding effects, it can be very situational. Depending on what you want for your sound, you may or may not be doing everything in these steps. Not every audio track needs all of these steps, but it’s good to tweak with these in case the audio sounds better.
Out of all of these below, you’ll most likely only need EQ and compression for general work, but it’s good to know about these other tools at your disposal.
Gain

You might see this knob and wonder why it adjusts the volume even though there is a volume slider. That’s because gain and volume control how loud the sound is at different stages. Gain controls the raw sound itself before any effects are applied and volume adjusts how loud the sound is AFTER all effects are applied. You will most likely not need to touch this.
Pan

This knob determines which side of the headphone your sound will be more dominant in. For sounds and vocals, you don’t want to change this. This setting is usually for music production, so you most likely will not need to touch this.
Equalization (EQ)
Equalization may seem a bit confusing at first, but think of it as volume at certain frequencies. Out of all of these effects, EQ is the most important. You’d want to adjust the EQ because certain frequencies for certain sounds just don’t sound good especially when combined with other sounds or background music. I need to clarify that each sound is unique, so how you EQ audio is also unique. EQ is something you need to feel in your ears in order to get it right. However, there are general guidelines all sounds follow for EQ.
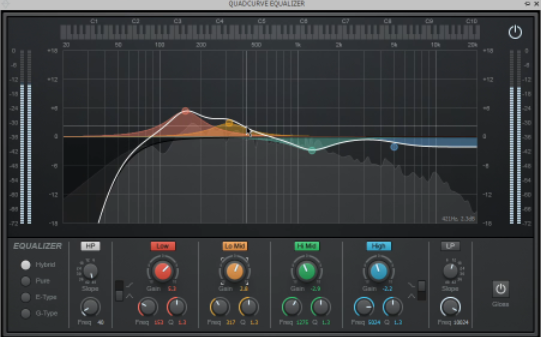
This UI might look confusing, but think of sound as a 2D space. Those light-gray waves display what the sound looks like. Frequencies, measured in Hz, is the space in pitch where a sound occupies. The volume (dB) measures how much that sound takes up a frequency. When you have multiple sounds, they can occupy the same frequency, but too many sounds can make the overall mix “muddy.” Also, keep in mind that volume is logarithmic, so the jump between 1db to 2dB is far less than 50dB to 51dB.
No matter what sounds you use or record, there’s gonna be unheard low-end sounds, so apply a high-pass filter. This will help additional audio effects that may amplify these sounds such as reverb or compression. This filter is usually applied around 40Hz to 70Hz. If your sound is heard while background music is playing, then it won’t occupy the bass (lower-pitch) space in that background music.
If you want to add clarity to a sound, you can boost the higher frequencies or add something like a “shelf” to add that sparkle. Unlike the high pass filter, you don’t always have to do this, and it might hinder your sound to do this all the time. You’ll have to use judgement.
Because of how unique sound is, I highly recommend this guide to learn the vocabulary and what to look for when adjusting the frequencies in EQ. I’d explain it myself, but this guide I linked is the most condensed guide possible for EQ. This guide explains EQ better than I could, and I’ve been messing around with this stuff since 2018! Out of everything in that guide though, I recommend cutting first then boosting so in that way you’re creating space for other sounds whether that be another track in your DAW or other sounds or background music in your projects. Again, this is something you’re mostly going to have to feel to learn because every sound is different, and it is important to feel to learn because EQ is the most important step for sound design.
HOWEVER, you can get this feel yourself by taking one of the points on the EQ graph and moving it around while a track is playing.
Compression
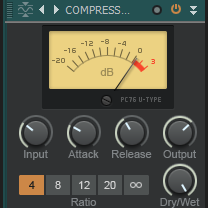
There sometimes might be a sound that feels too quiet but also later gets too loud at the same time. Compression is a fix for that! It boosts the quiet parts of a sound while also quieting loud parts of your sound that “go into the red.” What I mean by this is if you look at your “track bus volume” and press play, the volume light can turn red. That means your audio is close to or is clipping, and it reduces the audio quality by blending these loud frequencies with more quieter ones. With most default compression settings, you’ll be fine just to slap it on. If not, then there are guides available telling you everything about compression. THIS IS ALSO AN IMPORTANT EFFECT. Sometimes, you’ll need to use this, but you’ll know when you need to by looking at the volume output.
Reverb
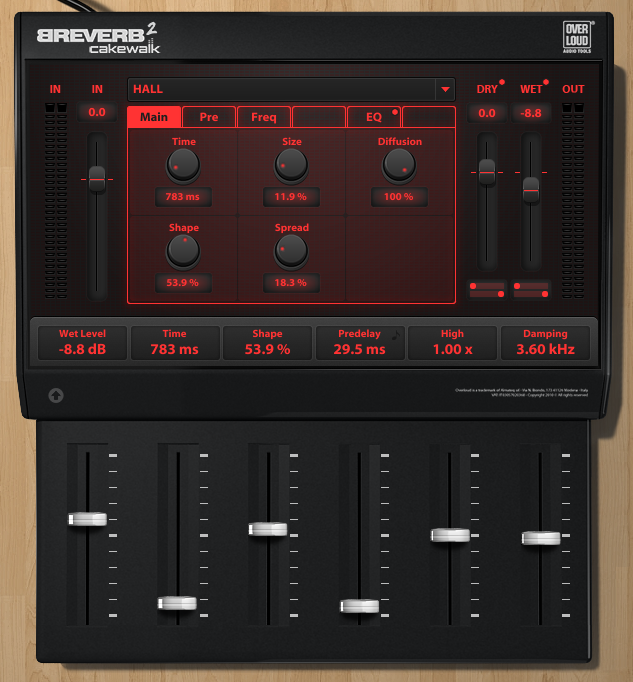
You might want that extra bleed that reverb can provide, but this can be very easy to abuse. It might sound good on its own, but it also might muddy when compounded with other sounds. Reverb is best done subtly. It amplifies higher frequencies, and higher frequencies can sometimes be easier to pick up by the ear. There are times you might want more reverb though such as a cavern or an underwater effect. When done right though, it can make your sound feel bigger and take precedence over other sounds.
Delay
It’s basically like an echo effect, so it’s very situational for when you’ll need to use this.
Automation
This can be used to change the values on any effect WHILE the track is playing. It’s very powerful and very useful. You’ll most commonly use this for something like volume either to make the sound initially quieter then louder, or you may use this to remove a *click* sound certain tracks can do when merging two tracks with different audio levels. You’ll know when you hear this.
Tip: To make a sound feel bigger, set the volume automation to be quieter at the beginning. In music theory, a crescendo adds more impact to a long sound.
Tip #2: You can use automation to remove excess noise
Exporting
When your sound is exactly how you want it, export it in the file format of your choosing and use it in your projects! When exporting, ensure the master volume doesn’t go red. The yellow light can best be described as “just right,” but below it when it’s green is acceptable. It’s always easier to turn up the sound’s volume later in the project pipeline than if it’s too loud.
When exporting, I recommend exporting both an MP3 (compressed) and WAV (uncompressed) file of each recording. It’s good to have both even though you’ll most likely want to use WAV whenever possible. Most game engines and video editing software compresses the sound anyways, and using an MP3 compresses the compression. However, the bright side of using MP3 is that it keeps your overall project’s and game’s file sizes smaller. There are also occasional times where WAV is incompatible, and MP3 is typically universal. The huge problem with WAV though is that this format can be significantly larger in file size. If worse comes to worse, you can convert an uncompressed format like WAV to a compressed one like MP3.
My Workflow
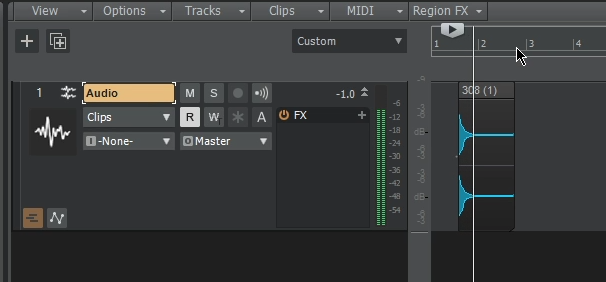
If none of the above makes sense, I’ll share my process in order. I’ll start by importing this .308 gunfire, playing the sound, and trimming the excess empty space. The gunshot sounds thin compared to hearing it in real life, so it could go for more impact.
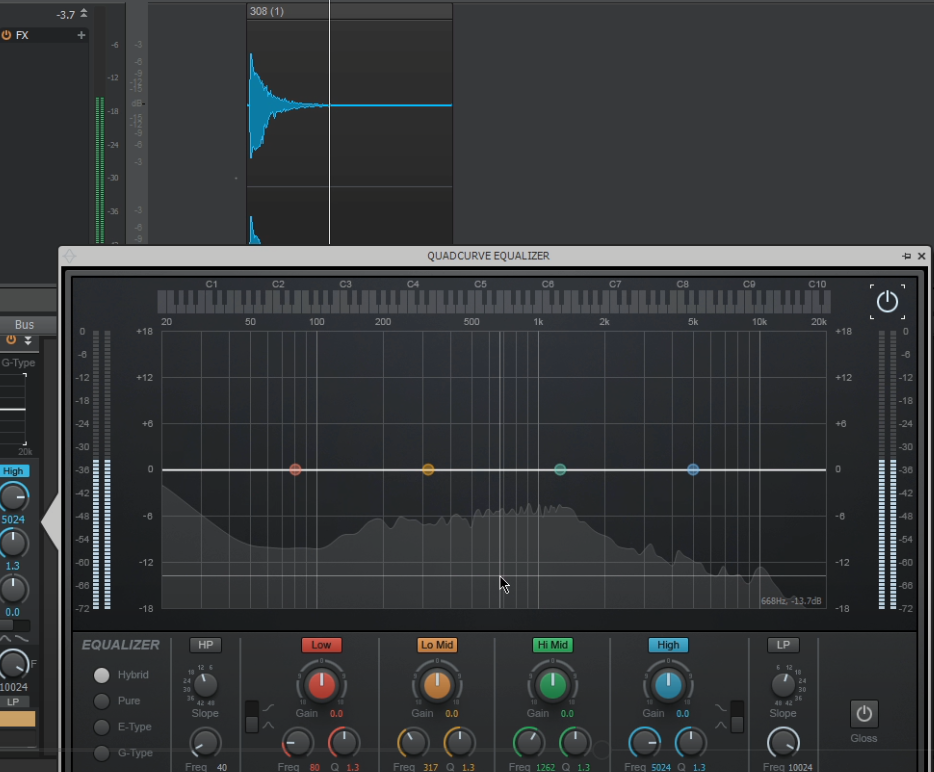
For that to happen, I’m going to view the EQ by double clicking on the EQ graph. In Cakewalk, this is in the track bus under the Console tab. Once opened, click on the power button in the window’s top right corner so that it is white. We can now see what this sound looks like when playing the track back.
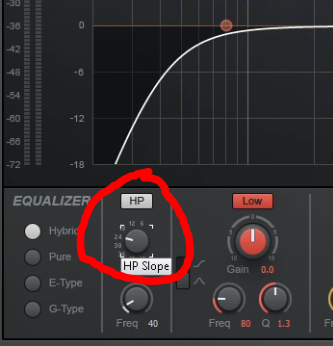
We can barely hear frequencies to the left of the 50Hz line, so we’re gonna completely remove it with the High Pass Filter and crank the slope up to 48. There are going to be times where this filter’s frequency may be adjusted such as a naturally higher or lower pitch sound, but we don’t need to do this in this case.

Next, we’re going to reduce all of the harsh frequencies, and we reduce first because it’s easier to isolate these frequencies before any frequency is boosted. To do this, I’m going to take an EQ node, boost the gain at different frequencies, then reduce that frequency by a few dBs. We don’t want to reduce this too much because volume is logarithmic, and there are some harmonics still present that I want. Completely reducing the gain will make the sound “hollow.”

I’m also going to play around with the higher frequencies that can give the sound a brighter feel. To cover all of this range, I’m selecting the shelf mode on the High EQ node. This is all being clumped by that shelf because it doesn’t really matter if we isolate above 5kHz, and our sound is mostly in the lower-end spectrum. We’re not going to add a Low Pass filter because the human ear can hear all of that range albeit very subtly. Although you could say the same thing with the low-pass, the difference here is that you can’t hear the difference on the lower frequencies. There are times where you’ll need to add that high pass, but by adding in this case, it makes the gunshot sound muffled.
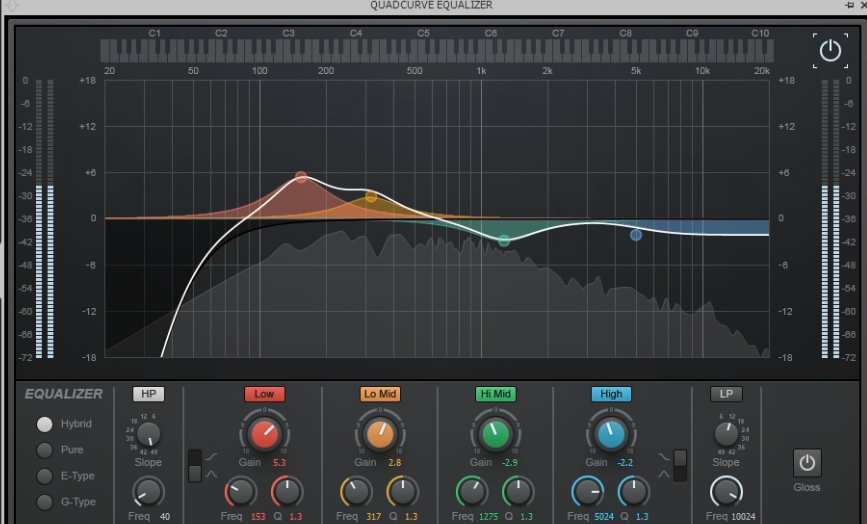 Since I now cut what I wanted, it’s time to boost frequencies that can give that impact for this sound. I’m gonna start with the low end because that’s where I assume this boom is, and lower frequencies can be harder to hear. I raised the Low EQ node to almost +6 dB around 150Hz. This might not sound noticeable at first, but side to side you can really hear the difference. Sometimes, subtlety is key. The only node that’s left is the lo-mid, so I’m going to raise the gain by 12dB just to hear what it’s like. What I got from this is that this range is where most of that initial boom is, so I’m setting the gain to 3dB. To absolutely know if this sounds better, I’m going to turn off the EQ and compare the before and after. To know this sound is loud enough, the volume slider’s highest volume should be in the yellow which it is.
At this point, this sound doesn’t need anything else, so it is now time to export. For my game, I’m going to export this as an MP3, and I’m going to export it as a WAV so in that way I have full sound in its uncompressed form. The best practice is to use WAV for your projects, but I’m using MP3 because my game is retro.
Creativity
Coming up with sounds for your project or game might be the hardest challenge for some people. There’s really no right or wrong way on how to get these ideas, but here’s a good creative exercise I use to get started. Go about your day, and think of the sounds you hear. This could be as obvious as opening a door or something as obscure as a footstep. Also, take the time to play some games, listen to their sound design, and take notes on what details make these sounds fit. For example, UI can be very percussive while something like a platformer jump raises in pitch over time. Both real-world and in-game studies can be combined by drawing similarities between the two. I recommend researching foleys for realistic sounds, and for more artificial sounds, play around in your DAW, download instruments, and more!
My Sendoff!
This is as condensed as a guide as I can get while also sharing how I tweak my sounds personally. If you’re still confused, I recommend looking at the “My Workflow” section to see everything in action or watching my video in this section to have a better visual aid. This sound I edited is planned to be used in Soldiers’ Descent, the turn-based RPG with shooter elements.
Leave a comment
Log in with itch.io to leave a comment.