How I Recorded These Sounds: Part 1
Hey, it’s SnakeF8!
This is part 1 of a 2-part series. Check out part 2!
Since my Authentic Gun Sounds pack has reached over 100 downloads, here’s my extensive guide for how you too can use audio on a professional level! This guide is designed in such a way that you can do more than just record sounds because being a solo developer or small team means you’ll have to squeeze as much as you can for an affordable, all-for-one solution. Everything here can be used for recording sounds, voice work, streaming, music, and more!
Devlog also in video format for a different way to view!

My Background
Even though you probably want to jump right into the guide, I’d like to share my ethos behind the topic. I’ve been in a few bands since 2018 which forced me to learn audio engineering on a budget. Our efforts allowed us to release a single and produce a handful of unreleased demo tracks. Currently, I’m still using these techniques for my YouTube channel and my team’s game, Soldiers’ Descent. I’ve learned a lot from these experiences, so I’m hoping I can extend this knowledge to anyone reading this.
Preface
There are only three things that limit your ability to design sounds: Hardware, Environment, and Creativity. Creativity isn’t something I can help you with… at least in this part. If you already have a microphone that you plan on using (and a pop filter), go to the Configuring Your Mic chapter where you can properly set it up.
Getting your microphone ready is by far one of the most important things you can do when recording audio. Your bottleneck isn’t your ability to use the software. It’s how you use your hardware. It’s like rust on a sword. It’s easier to prevent rust than clean it off. Cleaning off the rust reduces the quality of the sword tenfold. As another saying goes, you can’t polish a turd.
Hardware
All you really need is a microphone AND a pop filter. That’s it. This is really your only required financial setback, but even lower-end microphones can provide good quality if you know where to look. Everything else can be done for free.
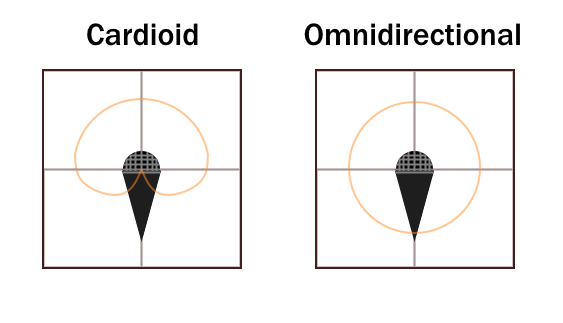
HOWEVER, if you’re looking for a microphone, get a cardioid microphone. Cardioid focuses sound pickup directly in front of the mic, and the diagram above shows how a cardioid hears sound when looking at a bird’s eye view. Because cardioids are less sensitive to sounds behind them, these are the go-to for recording.
I do not recommend a super-cardioid/dynamic microphone. Even though they can focus on sound in front better, they have the downside of being sensitive to sounds directly behind them. They have a tighter cardioid pattern, but you lose out a lot of sound detail. They’re designed for being on stage and recording guitar amps.
Omnidirectional mics pick up sound basically everywhere. You’ll most often see these in stuff like podcasts because they pick up sound in all directions. I HIGHLY don’t recommend omnis for sound recording because of their principal design. They’re so sensitive they can pick up your PC fan, chair creaks, etc. very easily. If you do use an omnidirectional microphone, they can work as well as cardioid mics if you’re very careful. Everything in this guide still applies, but you’ll have to approach with a lot more caution.
There are also two cable types microphones might use: USB or XLR. USB is “plug-and-play.” You just plug them in and they work! You don’t need any other equipment for a USB mic to function. The only con to a USB mic is what you see is what you get because everything is built into it. XLR microphones require an audio interface which may set you back another $100, but that means you can better fine tune your sound. The XLR cable format is also the standard for professional audio production. An XLR microphone standalone can cost as much as a USB mic of a similar quality. Personally, I don’t notice the difference between the two cable types when comparing quality, so you’ll be fine with just a USB mic.
When it comes to buying a specific microphone, I can’t really say which one to get because quality microphones are becoming more affordable. What I can certainly say is that you’re going to have to do your own research based on your own budget. If money is a concern, start at the $50 mark. I know that might be a fair bit to start, but you’re most likely going to use this microphone for many years for many different purposes beyond recording. Back in 2015, I got a Blue Snowball because that was THE budget microphone to get with the best quality. I’m still using it now as of writing this article, and I used it to record the Authentic Gun Sounds pack. The best advice I can give for purchasing a microphone is if you think it sounds good, then it’s good. Trust your ears. Check YouTube to compare microphones at different price points.
Get a pop filter! They’re used to reduce sounds that are plosive like ‘buh’ or ‘puh.’ These can sound very unpleasant even on the most expensive mics. This is most common when doing voice work, but certain sounds recorded with objects can also have plosive properties, so a pop filter is a MUST HAVE. Luckily, these are cheap! You can get a pop filter for about $8 on Amazon, and it will do the job perfectly.
One piece of equipment I highly recommend is a boom arm. It’s a crane that allows you to fully adjust your mic. Sometimes, the mic you purchase comes with either a boom arm or a mic stand. I recommend upgrading to a boom arm because you shouldn’t adjust around the mic; the mic should adjust around you. Get the cheapest boom arm you can find on Amazon (they start at $15). You might also want a shock absorber. These remove any vibrations that can happen, but that’s just a small footnote.
If you plan on recording music, owning an audio interface is a MUST HAVE. If you don’t plan on recording music, you can skip this paragraph. As a small team, Scarlett Focusrite is the best, most affordable audio interface you can get. More specifically, get the model with both XLR and ¼ inch cable support so in that way you can plug in mics, guitars, and pianos.
The TLDR for hardware:
- Get a microphone with a cardioid polarity pattern
- The $50 range is a good start as the bare minimum
- *You can likely find a cheaper one just as good*
- A USB mic will work just fine
- If you plan on getting an XLR microphone, get an audio interface
- Do your homework though. Quality cardioid mics are getting more affordable than they were a few years ago
- A POP FILTER IS A MUST!
- Boom arms will save you a lot of time and comfort
- If you’re frugal, you can get a quality microphone, pop filter, and boom arm all under $75
Environment
Depending on where you live, your recording environment may need to be adjusted. If you live in the city or live in a place with thin walls, you may need to record audio at different times. For the Authentic Gun Sounds pack, I had to be outside to capture gunshots! The environment determines how sensitive you can have your microphone without any background noises which is why you should use a cardioid microphone. DO NOT BUY ANYTHING UNTIL AFTER YOU CONFIGURE YOUR MICROPHONE. There is a chance you might not need to buy anything.
One test you should do is the clap test for acoustics when you’re indoors. Clap your hands once and listen for a metallic echo or reverb. It’ll be a little harsh and tinny. If you hear this, you may need to adjust your environment. It’s not just a reverb thing- it gets into the sound itself! This happens because sound travels. Sound will bounce off of walls, distort, and travel back into your microphone. This is bad. This will make your sound unpleasant. Fixing bad acoustics can either be relatively cheap or outright expensive. The most expensive fix is installing acoustic foam on walls, but there’s some trial and error to it. A more moderate fix is to buy one of those isolation shields for like $30. They work, but there’s two issues with them: They might not be compatible with your boom arm, and they can take up some space if set up in front of your PC. The cheapest fix you can do is put thick sheets on surfaces such as walls. You can try tweaking your microphone’s sensitivity, but the poor acoustics can still bleed in. When recording these gun sounds, I did everything I can with a low budget to remove bad acoustics, but a tiny bit still got in. Depending on your situation, it’s near impossible to fully remove, but you can still remove most of it.
Configuring Your Mic
Many issues people have about microphone quality are that they haven’t properly set it up. Before recording any sounds, use your voice as foundation. I will be showing both the OS and Audacity ways to adjust microphone sensitivity.
- Step 1: Turn off or remove any background sound source
- Plugged-in cables and turned-on devices can cause noise due to electric interference. This can’t be entirely avoided though because your primary source is going to be your PC
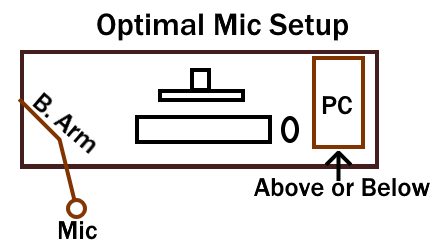
- See if you can move your PC under your desk or further away from your microphone (be mindful of your PC’s airflow). If your PC is on your desk, it’s possible for your mic to pick up the fans. If you need your PC on your desk, you can still follow the steps below. That just means your mic sensitivity has to be lower
- Make sure your mic is on the opposite side of the desk from your PC. The further away your mic is from the PC, the less it will pick up the fans
- Ensure the PC is further back on the desk than your mic. If your mic is a cardioid, then it will be much quieter
- Step 2: Turn your volume up to max
- Step 3: Two ways of adjusting microphone sensitivity:
- Adjust your microphone sensitivity through your OS
- For Windows, open up Settings -> System -> Sound -> Input -> Device Properties - > Additional Device Properties (On the right)
- Go to “Listen” and checkmark ‘Listen to this device’ and press apply
- If you hear any background noise, lower the microphone sensitivity slider in “Levels”
- Adjust your microphone sensitivity through Audacity
- Record a track without speaking for a few seconds then play it back
- If you hear any background noise, lower the ‘Recording Volume’ slider (microphone symbol)
- Rinse and repeat
- Adjust your microphone sensitivity through your OS
- Step 4: Adjust microphone accordingly
- The pop filter should be at minimum 2 inches away from the mic
- Since you turned down your microphone sensitivity, your desired sound or voice is going to be much quieter. You might be tempted to turn the sensitivity back up, but don’t! Move the microphone closer to your mouth. This might feel a bit uncomfortable, but if you see videos of people singing or content creators on YouTube or Twitch, they are very close to the mic. This applies to recording sounds too. Everything depends on your mic and environment. I would start by moving the mic about 6 inches away from your face or whatever you’ll be recording. Many sources say many different things about how far your mic should be, but 6 inches is a good start.
- Step 5: Record yourself speaking in a speaking voice directly facing the mic.
- Step 6: Repeat steps 3 to 5 if need be as minor adjustments
- For optimal quality, the mic can be anywhere from 4 to 12 inches away from your face as long as you do not hear background noise and you can hear yourself just fine with a speaking voice.
- Anything further than 12 inches will negatively affect the sound
- Note: AFTER DOING ALL THESE STEPS, it is perfectly acceptable for the background noise to be *barely* audible. When you’re recording a sound, you won’t even hear the background noise unless it is dead silent.
Closing
That’s really all of the advice I can give for the hardware portion of this guide. Give your mic a whirl and stay tuned for the next part where I’ll get into the actual recording and sound design. While waiting for the second part of this guide, experiment, and get comfortable with your setup. Doing that is extremely important before going into part 2. If part 2 is already released, I highly recommend doing those two things before continuing further.
Leave a comment
Log in with itch.io to leave a comment.